Articles
How to Build a RAG Pipeline with AWS Knowledge Bases, S3, and Terraform
BY John Naglick
•Wed, Oct 22, 2025
If you've been in the application space of AI for the last couple years, you've no doubt heard of Retrieval Augmented Generation, or RAG for Acronym lovers! What started as an elaborate prompt engineering technique combined with (often cumbersome) library implementations now has full-fledged first-class support from a range of providers. AWS Knowledge Bases is a favorite of ours. It's evolved into a robust service that allows you to define RAG as configuration, removing any need for prompt engineering or juggling LLM calls, letting you focus on your RAG-based application features instead.
In this article, we'll show how to build an end-to-end RAG pipeline using Knowledge Bases. Our infrastructure will have these pieces:
- An S3 bucket holding the origin documents
- An OpenSearch serverless DB holding the vectors
- A Knowledge Base configured with the bucket, database, models, parsing, and chunking strategies.
- A Lambda that launches an IngestionJob on the Knowledge Base, triggered from event notification configuration on the bucket.
Putting it all together, we'll have a pipeline that allows us to drop files into an S3 bucket and have them show up in results to Retrieve and RetrieveAndGenerate API queries on the other side. You can build countless RAG-based features off of this backbone, for example:
- Build a web UI to "chat your data" by wrapping RetrieveAndGenerate
- Build a slack app that gives your employees a /search command for internal docs by wrapping Retrieve
- Write an ingestion function that aggregates zoom meeting summaries and drops them in the bucket - you can now search what was said with natural language!
- Easily add more data sources to the knowledge base to take it one step further.
Understanding the Cost Structure of Your AWS RAG Stack
Before we begin, let's get a clear picture of the price associated with this setup. Not counting your data sources (in our case, the extremely cost-effective S3), you'll pay for vector storage, embedding model usage, and (if using the `RetrieveAndGenerate` API), text-generation model usage. You must specify the vector storage and embedding model when you set up the knowledge base, but the text-generation model is specified per-API request.
Choosing The Right Vector Database for RAG on AWS
You can use many different AWS services as your vector storage, and prices vary widely as such. (Note that if solely using 'Structured' data sources, it's not necessary to define a vector store, however this type of RAG is far different than the type we're discussing here).
At the time of this writing, "Vectors in S3" is still in preview, but will very likely be the most cost effective option. Failing that, OpenSearch Serverless should be the most cost effective option. It's a serverless solution so it's pay-on-demand and scales extremely well. There's also reserved instance pricing for bigger workloads. Overall, it's probably your best choice. If you're still just experimenting, you'll very likely remain in the free tier unless your S3 bucket contains a large amount of files. Consult [Amazon OpenSearch Service Pricing](https://aws.amazon.com/opensearch-service/pricing) for exact pricing.
We'll be using OpenSearch Serverless in our implementation, but there are lots of different options available. Be especially mindful here, because databases can be some of the most costly services on AWS!
How Embedding Models Impact Accuracy and Cost in RAG Pipelines
You'll only pay for your embedding model when you use it. But note that this will happen both when you run an Ingestion Job and when you execute `Retrieve`/`RetrieveAndGenerate` queries. The cost will be slightly higher than if you were to execute the model directly through bedrock.
Embedding models generally have much lower per-token costs than text generation models, and the Amazon Titan models (which we'll use in this demo) are some of the most cost effective on Bedrock. Consult Amazon Bedrock pricing (https://aws.amazon.com/bedrock/pricing/) for exact pricing.
As you dive into perfecting RAG implementations, the embedding model will be especially important for determining quality of output. You'll likely want to use different knowledge bases to employ different embedding models for different data sources. For this demo, we'll just use one KB with amazon titan text embeddings.
Managing Inference Costs with RetrieveAndGenerate API
You'll only pay for this when using the `RetrieveAndGenerate` API. You'll specify a model per `RetrieveAndGenerate` request and, like the embedding model, pay slightly higher token costs than if you were to use it directly through bedrock. Note that using this API is entirely optional, as your implementation could simply use `Retrieve` and hit an entirely different model to generate a final answer if necessary.
Getting Started: Set Up an AWS RAG Knowledge Base via Console
If you want a preview of where we're going, you can create a knowledge base entirely using the web console. (Although we'll eventually set up terraform and automate everything, it's always useful to look at new services in the web console first to get a feel for things!)
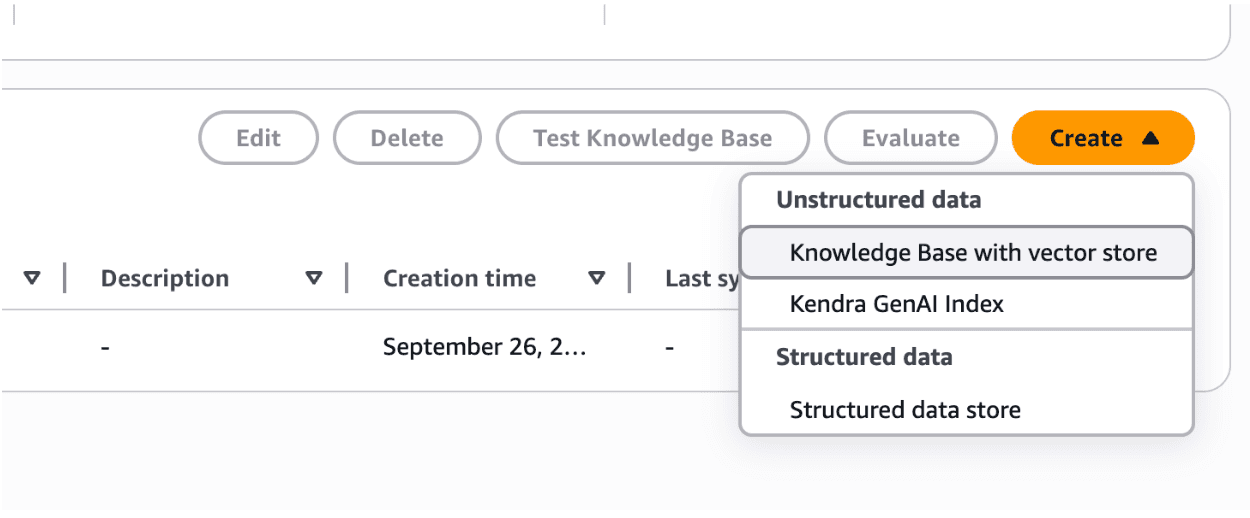
Step 1
Navigate to AWS Bedrock -> Knowledge Bases, click the orange "Create" button, and choose "Unstructured Data -> Knowledge Base with vector store"
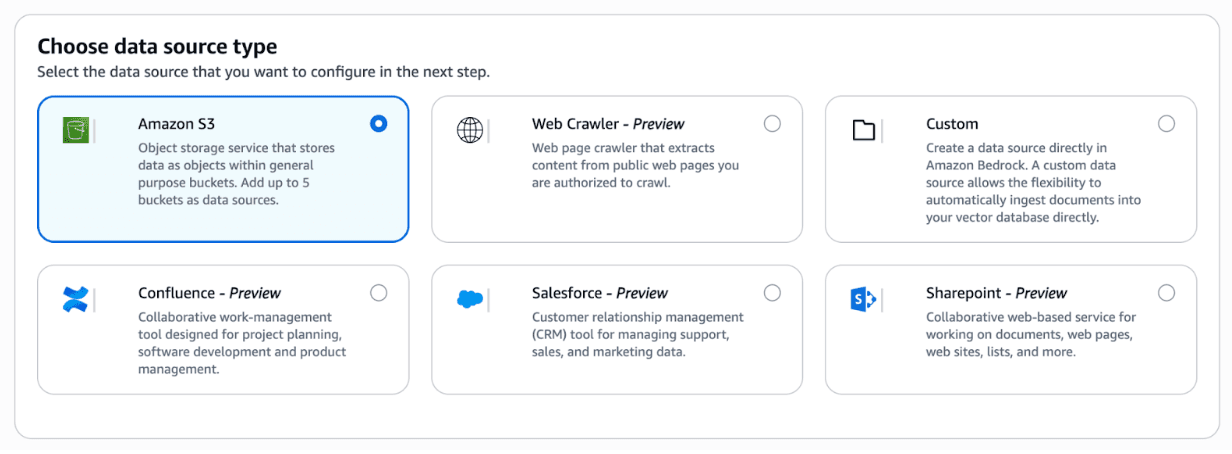
Step 2
Choose "Amazon S3" as the data source type
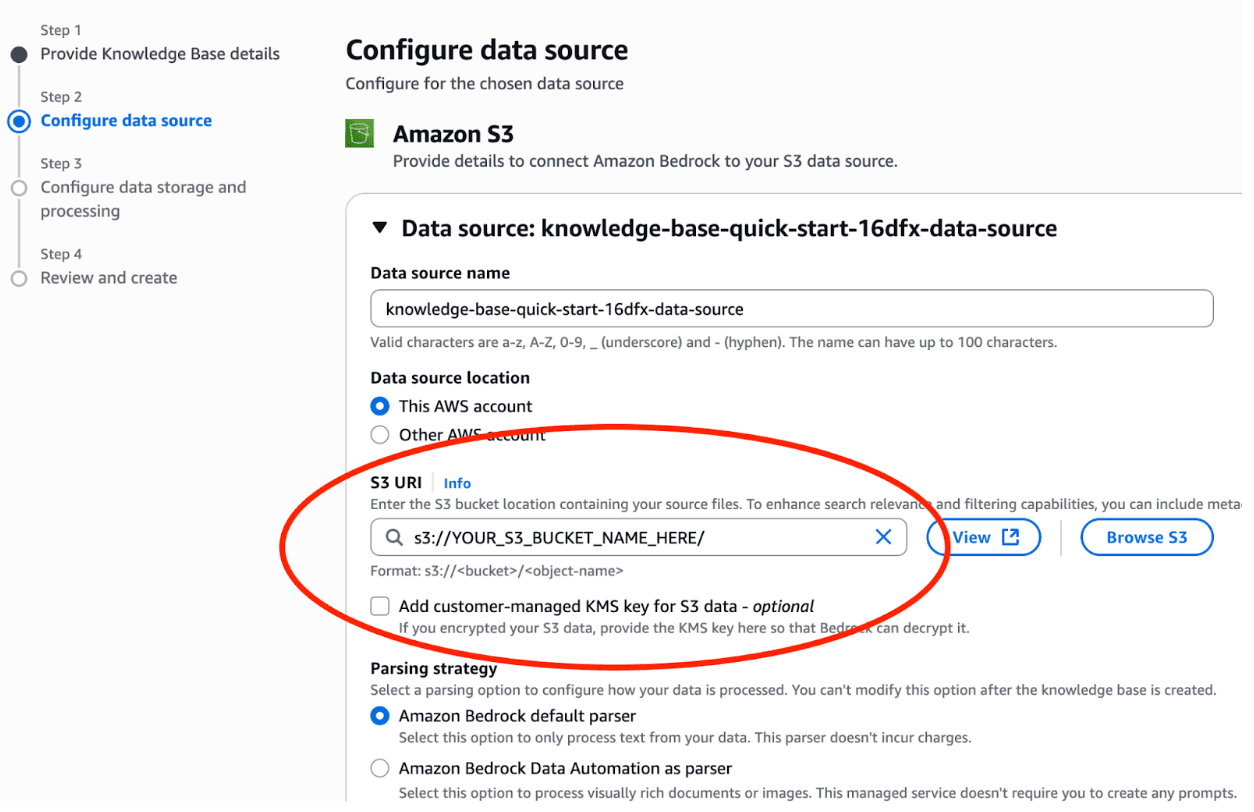
Step 3
Specify your target bucket under "S3 URI"
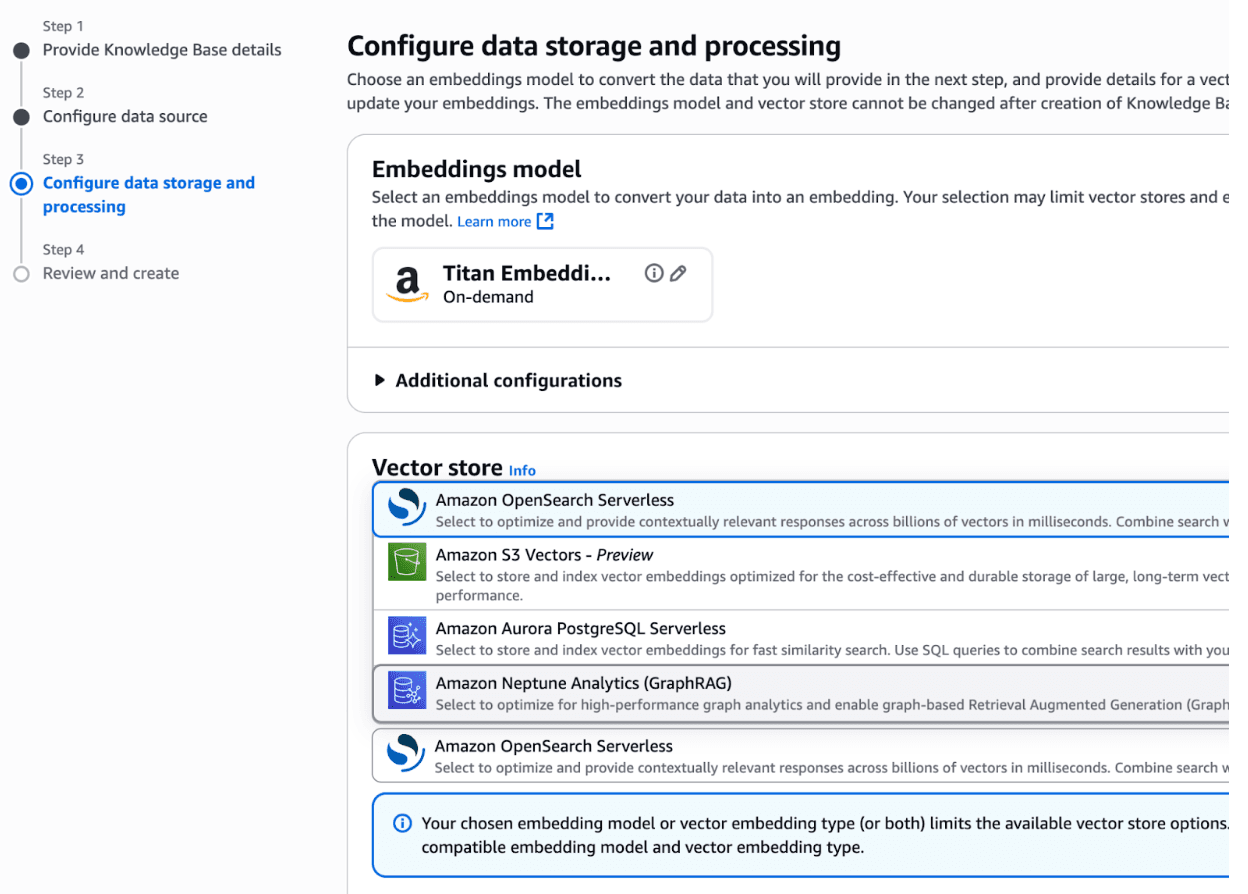
Step 4
Choose an Amazon Titan model for the embedding model, and choose "Amazon OpenSearch Serverless" as your vector store
Step 5
Review the details and click Create. It'll take several minutes to create the OpenSearch Serverless DB, but afterwards if all goes well you'll see some green confirmations

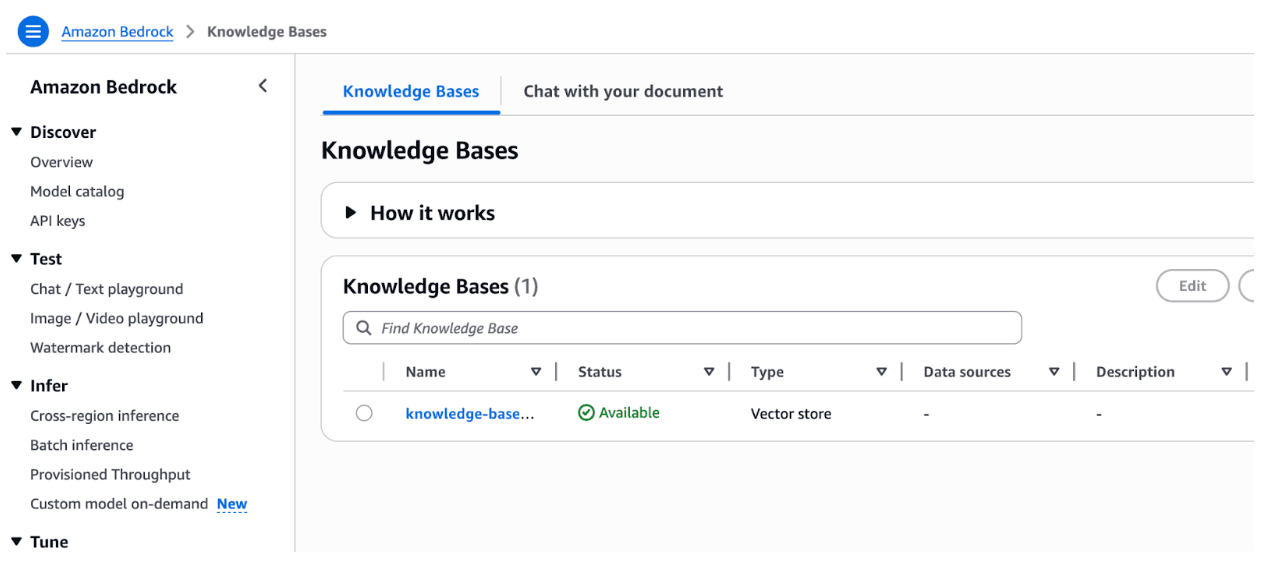
And your new knowledge base will be listed in the table on AWS Bedrock -> Knowledge Bases
Step 6
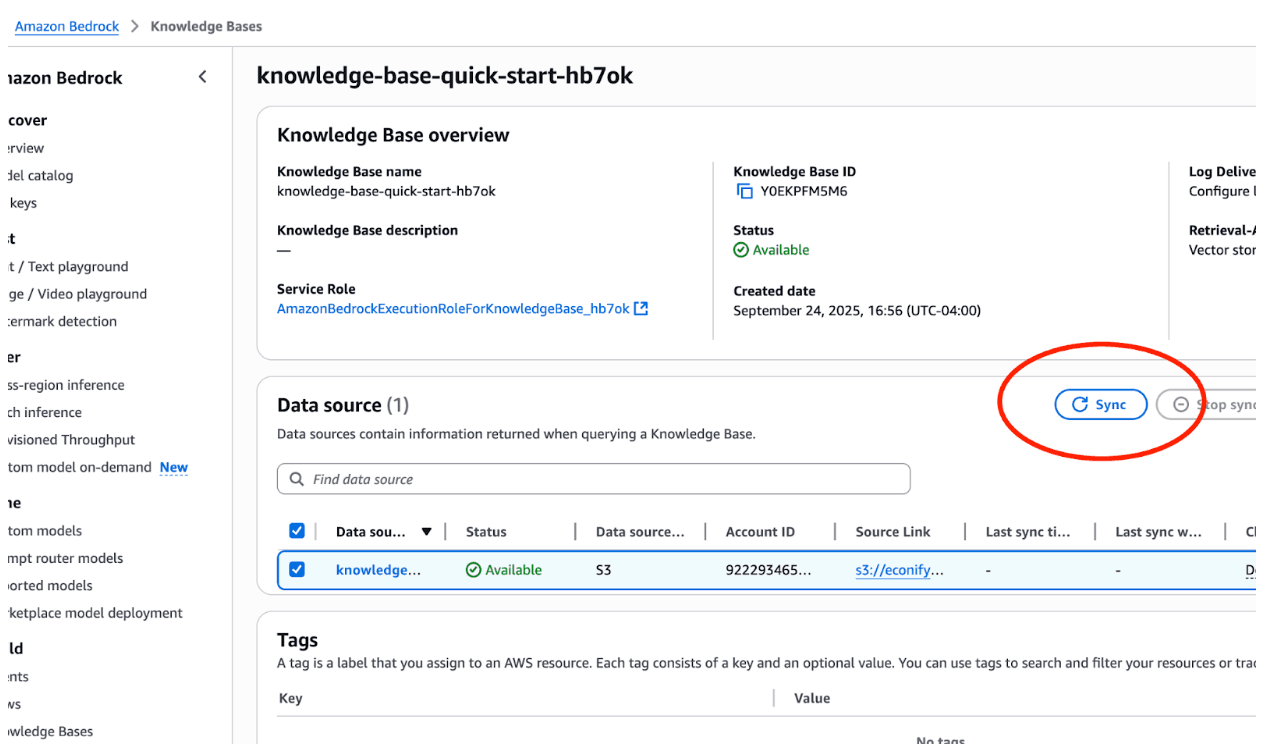
At this point, everything is set up, but your vector store has no data in it. Herein lies an important detail of Knowledge Bases: data is not automatically ingested into your vector store just because it exists in your data source. You'll need to launch an Ingestion Job which will sync *all* files in your data source into your vector store. (Note: If using S3 as a data source, you can add individual files rather than syncing everything)
Later in this article when we set up our pipeline, our lambda will make a StartIngestionJob API call so the ingestion process will be automatic. But for now using the console, navigate to your knowledge base, select your data source, and click 'Sync'
Step 7
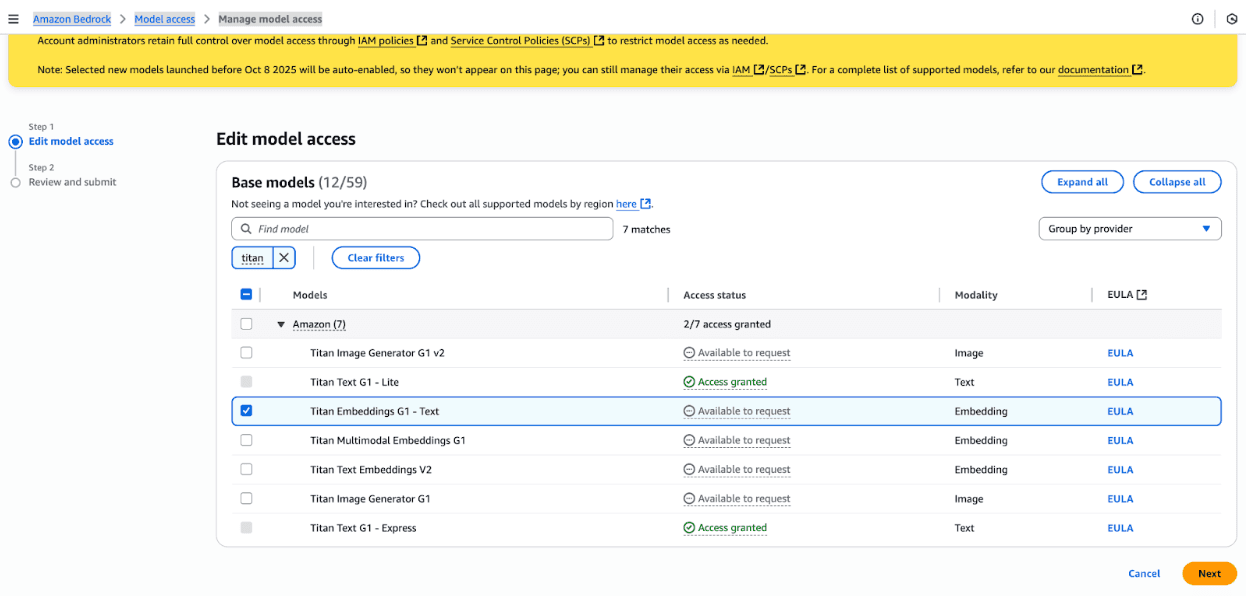
Uh oh! At this point, you might run into this error

Although this looks like an IAM permission problem, the wizard actually sets up the IAM role just fine. The actual problem here is that you must specifically request model access for the embedding model you choose. This is supposed to change on October 8th, 2025, so might be completely irrelevant by the time you're reading, but if it's not, navigate to the Amazon Bedrock -> Model access -> Manage model access page and request access for the embedding model you chose
"Approval" happens instantaneously, so if you try to launch another sync job, it should now work

Step 8
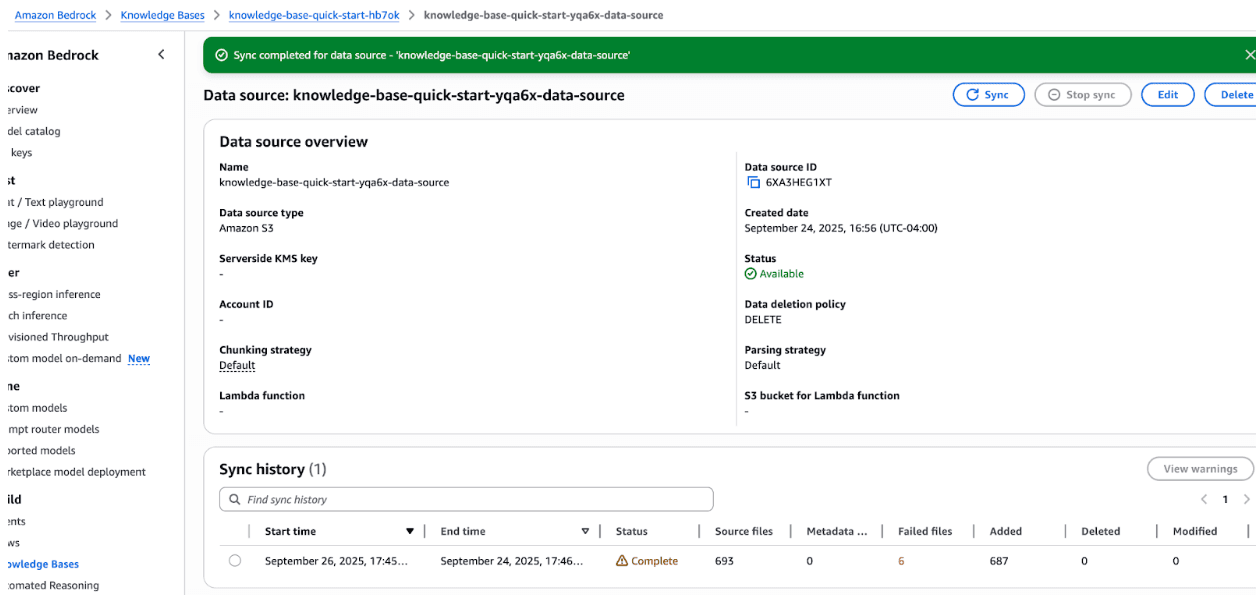
After the sync finishes, you can click into the data source and see the job listed in the sync history, along with a count of successful and failed files
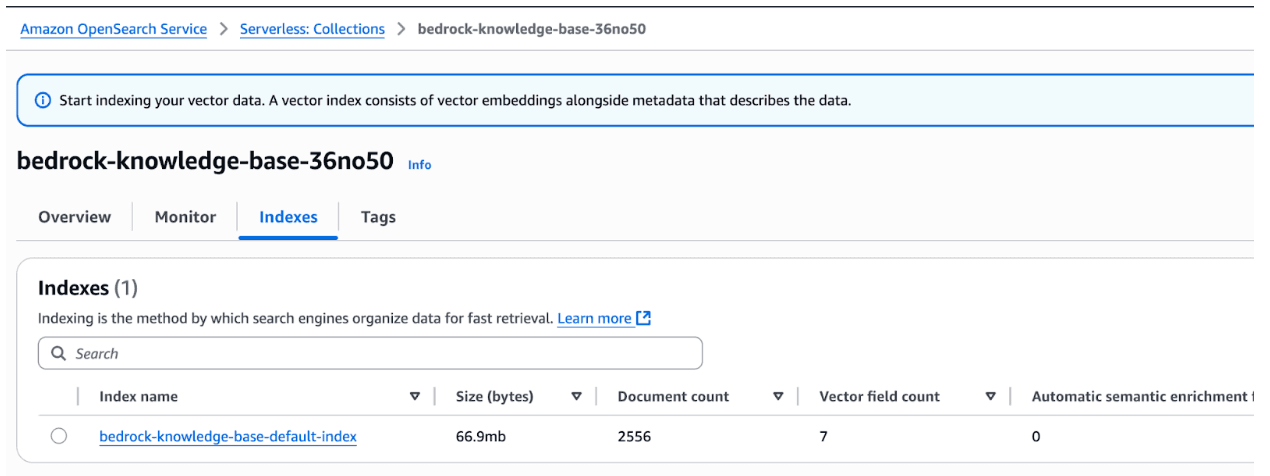
And you can also navigate to the OpenSearch Serverless Collection to see the actual DB size and document count
Step 9
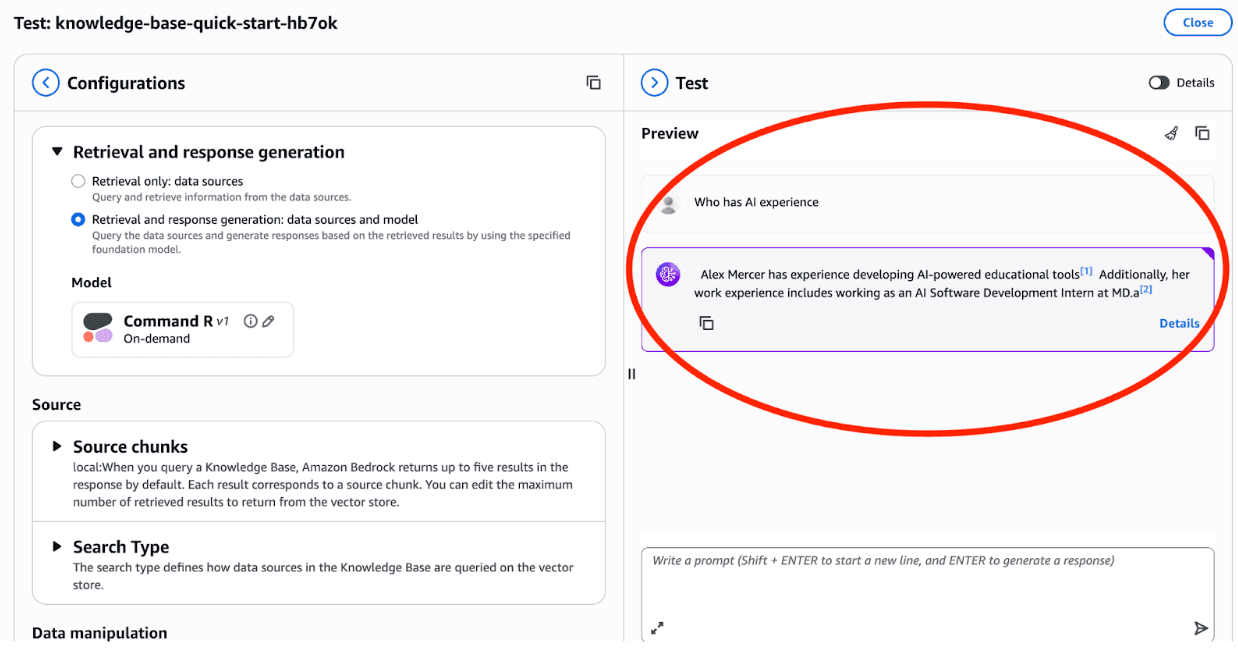
Finally, you can see your new knowledge base in action with the "Test Knowledge Base" button. Pick "Retrieval and response generation: data sources and model" to get a full summarization (rather than just a list of document references), select a text generation model, type in your prompt, and you should see an answer referencing your data!
Step 10
From here you can play around more, but be sure to delete your OpenSearch Serverless Collection and Knowledge Base itself to avoid any unforeseen costs after you're finished. See more information in the "Costs" section
Automate Your RAG Pipeline with Terraform and AWS Bedrock
The web console is fine for getting a feel for things, but in this project we'll be defining our infrastructure as code using terraform. IaC gives us a single source of configuration truth, lets other developers see our infrastructure setup at a glance, and gives us a way to automate creation, destruction, and changes to multiple environments. In short, it's a huge win over just clicking stuff in the web console and hoping everything stays working.
Terraform comes with many AWS Bedrock resources (22 at the time of this writing), and the one we'll be using for our Knowledge Base is **aws_bedrockagent_knowledge_base**. We'll also define the bucket, DB, lambda, and bucket event notification in our TF.
Terraform Deployment Strategy for RAG Infrastructure
To make things a little more manageable for this demo, I'm going to divide our TF changes into two phases. The first will be everything that we set up in part one for a complete knowledge base. This includes the S3 bucket, OpenSearch Serverless collection, and Knowledge Base itself. The second will contain the lambda, bucket notification, and permissions necessary so we can launch an ingestion job when a file is added to our bucket.
NOTE! You’ll have to create the OpenSearch Serverless Collection index yourself.
When you `terraform apply` the first template, you'll notice two things:
- First, you'll be asked for a variable value before changes are applied
var. your_iam_user_arn
This is needed so that you can create the collection index yourself
- Second, two resources will fail to create (The Knowledge base and its Data Source) and you'll get an error
ValidationException: The knowledge base storage configuration provided is invalid... Dependency error document status code: 404, error message: no such index | [my-bedrock-kb-demo-collection-index]
This is because, as of the time of this writing, there is no way to create the index we need in the OpenSearch Serverless Collection with terraform (Please email me if I'm wrong!). So, after the first `terraform apply`, you'll have to go into the web console and create the index yourself (I’ll include instructions in the following steps). This is why we add the ARN of a user/group we have access to to the collection's access policy in the terraform (If you're being really thorough, feel free to remove it after you create the index).
Step 1
Apply the first TF template (S3 Bucket, OpenSearch Serverless collection, and Knowledge Base)
`terraform apply` the following template: (Note: All templates and code referenced in this article live in a public GitHub repo here @ https://github.com/Econify/econify-blog-public)
Terraform Template: S3 Bucket, OpenSearch Serverless collection, and Knowledge Base
Step 2
Manually create the OpenSearch Serverless Collection index using the web console
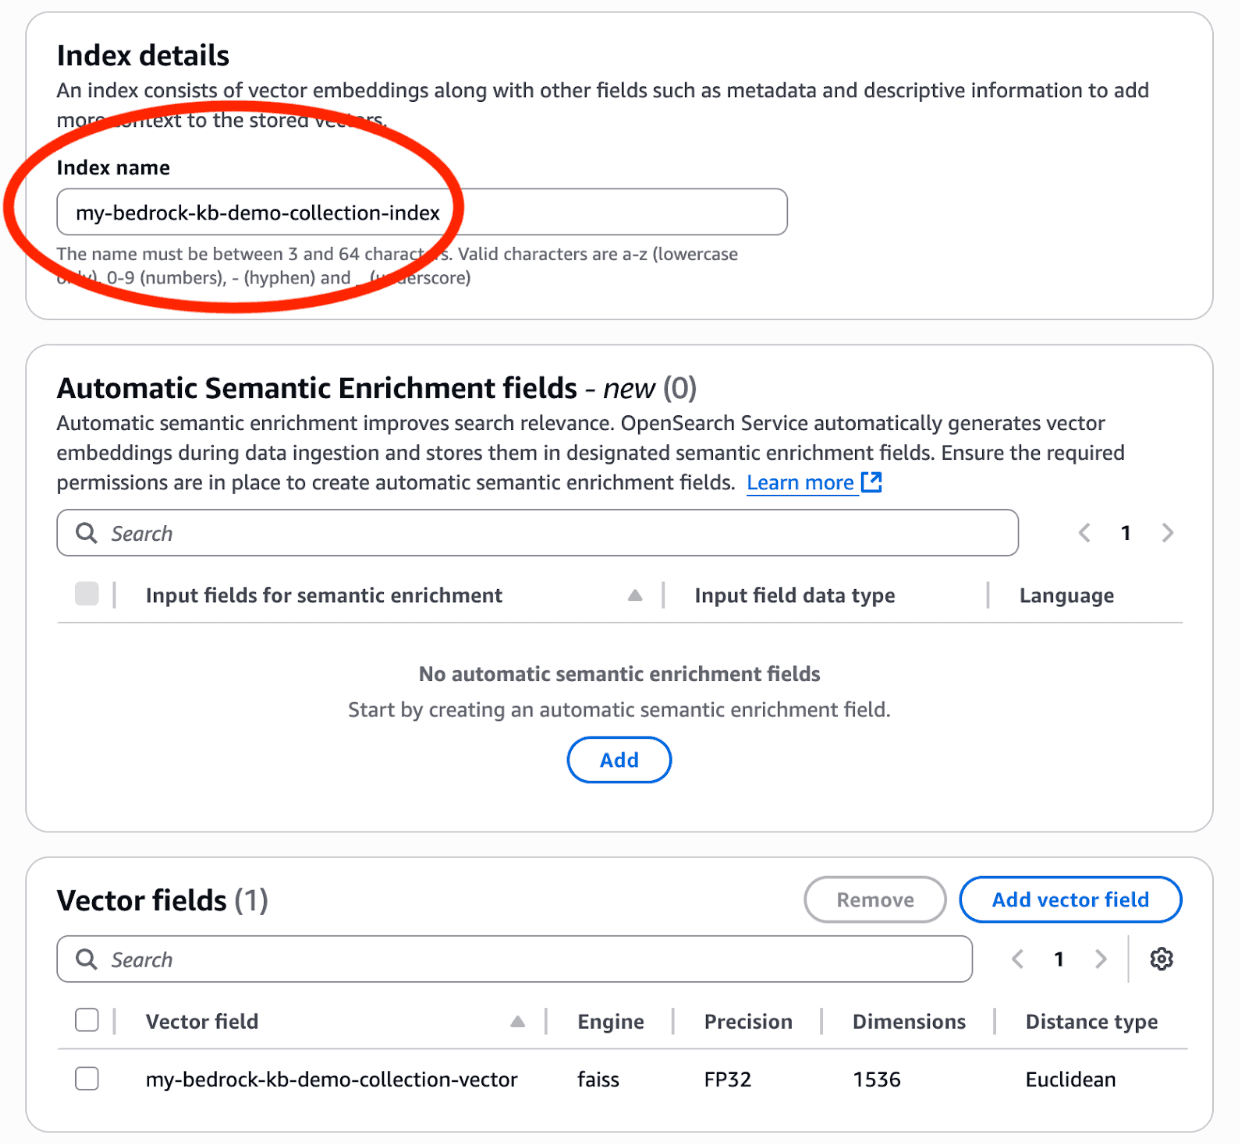
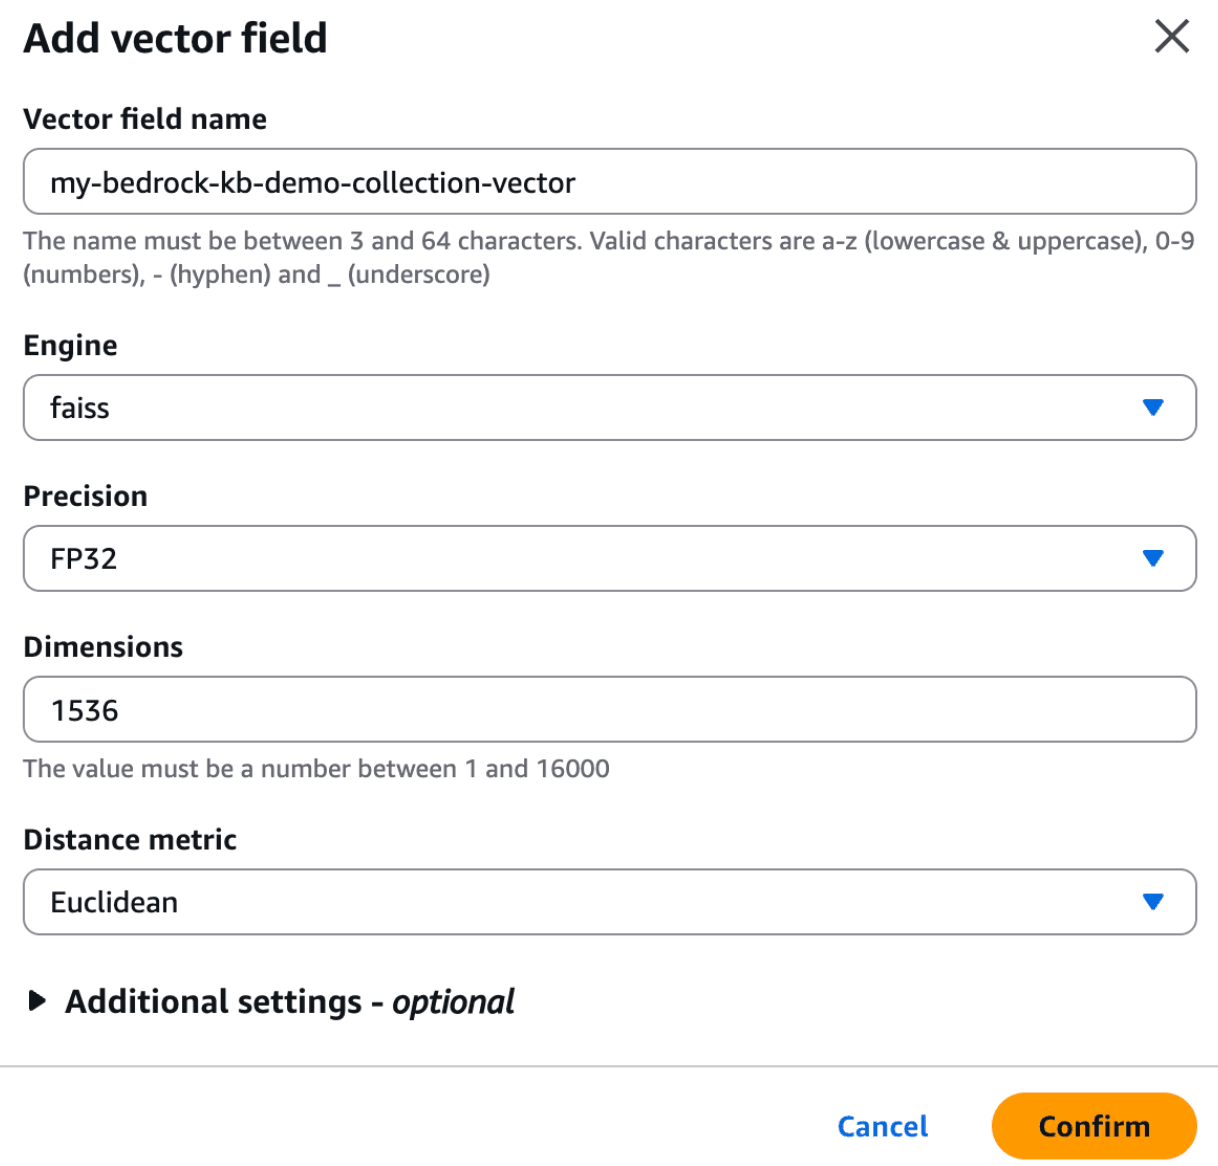
As described above, at this point you'll have to create the index on the new collection. Navigate to the new collection in "Amazon OpenSearch Service -> Serverless: Collections", click "Create Index", and add an index with the name "my-bedrock-kb-demo-collection-index". This name MUST match the "index_name" variable in the terraform template.
Add a vector field to the index with Engine="faiss", Precision="FP32", Dimensions="1536", and Distance Metric="Euclidean". Here are some screen shots of how things should look:
Step 3
Apply the first TF template a second time
After you create the correct index, run `terraform apply` again, and you should be in business! You'll now have everything we set up manually in Part 1 managed with IaC 😎
Step 4
Build the lambda.zip and apply the second TF template
Now that our Knowledge Base is configured, all that is left to do is add the lambda that connects S3 puts to KB ingestion jobs. First you'll need to create the lambda.zip archive, and then you'll need to run terraform for a final time.
1. Put the following index.js in a directory called `lambda/`
2. And then run the following commands to install dependencies and archive everything together
cd lambda
npm init -y
npm install @aws-sdk/client-bedrock-agent
zip -r ../lambda.zip ./*
3. Finally, grab the second template for the lambda
Terraform Template: Lambda and Bucket Notification
And with `lambda.zip` in the same directory as your templates, run `terraform apply` a final time to create the lambda.
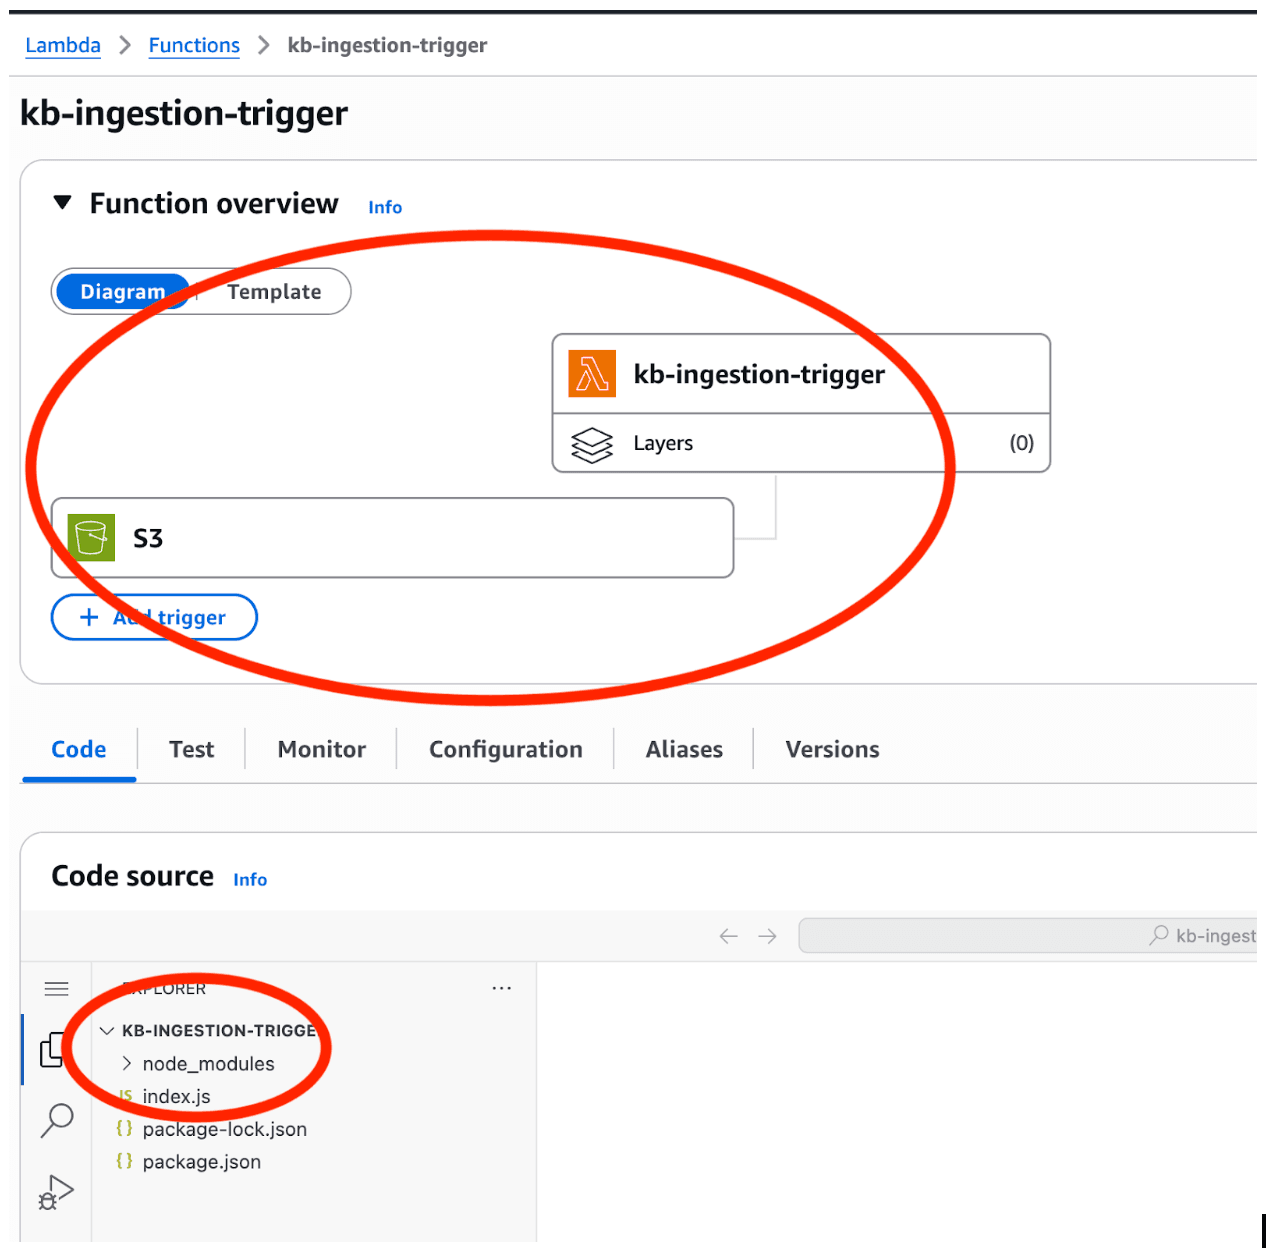
If all goes well, you should see your lambda with S3 trigger in the web console. Note that for purposes of this demo, it's also important that you have node_modules/ in the code source. But in a real production setup, we'd use typescript compilation and bundling to only emit a single bundle.js file.
4. Test everything out by dropping a file in your bucket. If all goes well, you'll see the ingestion job listed in the sync history of the data source of your knowledge base. Try chatting with your knowledge base in the console like we did before, and you should be able to get answers about the doc you just added!
Ideas for Extending Your RAG Pipeline
There's a lot of potential things we can build off of this backbone:
- A simple web UI that allows doc upload to the S3 bucket and a chatbot wrapping `RetrieveAndGenerate` calls is all you need for an inhouse "chat my data" application!
- "Ingestor" scripts that scrape doc sources and simply drop them into the S3 bucket give you a very simple, modular, and extensible way to get a lot of data in your vector DB.
- Experiment with other data sources - the "custom" source that allows you to ingest from API calls is especially interesting. Building an LLM "recommender" into an existing product search should be pretty easy!
What’s Next: Advanced Topics in RAG Implementation
Although we've covered a lot, there's plenty of complexity in RAG implementations that we didn't even mention. In our follow up blog(s) we'll discuss topics such as:
- Using different Embedding Models specific to data
- Enhancing results with document metadata, parsing, and chunking strategies
- Document de-duping
If you need any help or assistance, don’t hesitate to get in touch. And if you're exploring how to make generative AI work at scale—without spiraling costs or technical complexity—Econify can help. Our AI engineering team specializes in building practical, production-ready solutions like RAG pipelines, internal LLM gateways, and automated ingestion systems. Whether you're validating a proof of concept or rolling out enterprise-grade infrastructure, we’ll help you move faster, reduce risk, and get real value from AI. Contact us for a free consultation.